Mexican Cheesecake – ever heard of a dessert that sounds incredibly fancy but is secretly, almost unbelievably, easy to make? Well, you’re in for a treat! I first encountered this marvel at a friend’s get-together, and the creamy, cinnamon-kissed layers with that unique, buttery crust instantly captivated me. The best part? Discovering just how simple it is to bring this magic into your own kitchen.
This isn’t your typical, labor-intensive cheesecake experience. Forget complicated water baths or worrying about cracks! We’re diving into a recipe that uses flaky crescent roll dough as its genius shortcut, sandwiching a luscious, sweet cream cheese filling. Then, we top it all off with a dreamy melted butter and cinnamon-sugar mixture that bakes to golden, slightly crispy perfection.
If you’re looking for a dessert that’s both a showstopper and a breeze to prepare, this Mexican Cheesecake is your answer. It’s perfect for any occasion, or simply when that sweet craving hits. Ready to impress yourself?

Table of Contents
What Exactly Is This Mexican Cheesecake You Speak Of?
So, when you hear “Mexican Cheesecake,” what picture pops into your head? If you’re imagining a classic, dense cheesecake, perhaps with a hint of tequila or a dulce de leche swirl, hold that thought! While those sound amazing, the Mexican Cheesecake we’re talking about today is a delightful creation that dances to its own delicious beat, setting it apart from its more traditional cousins.
The primary difference you’ll notice in this Mexican Cheesecake recipe lies in its fabulous, no-fuss crust and its wonderfully simple, layered construction. Instead of a graham cracker base, we cleverly use store-bought crescent rolls for both the bottom and the top layers. This gives it an almost pastry-like, buttery, and flaky texture that’s just heavenly. Think of it more like a creamy, dreamy cheesecake bar or a sopapilla cheesecake – a popular treat that shares some delicious similarities!
Now, about the name: “Mexican Cheesecake” for this recipe style often refers to versions that incorporate that lovely cinnamon-sugar topping, reminiscent of churros or sopapillas, rather than indicating a cheesecake with deep historical roots in traditional Mexican pastry-making like, say, flan. So, is it one specific, universally recognized “Mexican Cheesecake” with a singular ancient recipe? Not exactly. It’s more of a fantastically popular and incredibly tasty interpretation that has won hearts (and stomachs) everywhere, especially for its ease and cinnamony charm. You might wonder, does its exact origin even matter when it tastes this good?
This simple approach means you get all the creamy, tangy goodness of a cheesecake filling, but with a unique textural twist and a super easy preparation method. No springform pans, no water baths, just pure, unadulterated yumminess that comes together in a flash.
Why You’ll Fall Head Over Heels for This Mexican Cheesecake Recipe
Honestly, what’s not to adore about a dessert that tastes like a million bucks but requires so little effort? I’ve made this Mexican Cheesecake Recipe countless times, and it never fails to impress. From seasoned bakers to complete beginners, everyone who tries it immediately asks for the recipe, and here’s why you’re going to be just as obsessed.
First off, let’s talk simplicity. You already know we use crescent rolls for the crust, which is a total game-changer. This means you skip the whole process of making and pressing a traditional crust. The filling comes together in minutes, and the layering is straightforward. Seriously, if you can open a can of crescent rolls and mix ingredients in a bowl, you can absolutely nail this recipe. It’s practically foolproof, which makes it a massive win in my book.
Then, there’s the flavor explosion. Imagine sinking your fork through a warm, golden, cinnamon-sugar top crust that has a delightful little crisp to it. Underneath, you discover a lusciously creamy, sweet, and tangy cream cheese filling that just melts in your mouth. And finally, you hit that soft, buttery crescent roll base. Are you drooling yet? The combination of textures and the comforting notes of vanilla and cinnamon make every bite pure joy.
And can we talk about versatility? This Mexican Cheesecake is my go-to for almost any occasion. Need a quick dessert for a weeknight family dinner? Check. Looking for something to take to a potluck that will have everyone raving? Double-check. It’s easy to transport, serves beautifully, and appeals to just about every palate. I’ve served it warm from the oven, and I’ve served it chilled the next day – it’s fantastic both ways! It truly is a dessert that adapts to your needs.
Print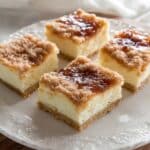
This Insanely Delicious Mexican Cheesecake Recipe is Shockingly Simple
- Total Time: Approximately 1 hour 50 minutes
- Yield: 12–15 servings 1x
Description
Indulge in a surprisingly easy yet incredibly delicious Mexican Cheesecake! This delightful dessert features a flaky crescent roll crust, a rich and creamy cream cheese filling, and a shimmering cinnamon-sugar topping. It’s the perfect treat for any occasion, ready in under an hour of active time, and guaranteed to have everyone asking for seconds. Think of it as the beloved sopapilla cheesecake, simplified!
Ingredients
- 2 (8-ounce) packages original crescent rolls
- 2 (8-ounce) packages cream cheese, softened to room temperature
- 1 stick (1/2 cup) unsalted butter, melted
- 1 1/4 cups granulated sugar, divided
- 1 tablespoon pure vanilla extract
- 1 1/2 teaspoons ground cinnamon
Instructions
- Preheat & Prep Pan: Preheat oven according to crescent roll package directions (usually 350-375°F or 175-190°C). Spray the bottom of a 9×13 inch casserole dish with non-stick cooking spray.
- Bottom Crust – Layer 1: Unroll one package of crescent rolls and lay it on the bottom of the sprayed dish, pressing seams to form a solid crust.
- Pre-Bake Crust: Bake this bottom crust for 4 minutes. Remove from oven.
- Cream Cheese Filling: While the crust is warm, place the room temperature cream cheese on top. Gently spread the cream cheese evenly over the warm crescent roll base.
- Butter Mixture: In a medium bowl, combine the melted butter, 1 cup of the granulated sugar, and the vanilla extract. Stir well.
- Pour Over Filling: Pour the butter-sugar-vanilla mixture evenly over the cream cheese layer.
- Top Crust – Layer 2: Carefully unroll the second package of crescent rolls and place this dough on top of the butter-sugar mixture, creating the top crust. Press seams gently.
- Cinnamon-Sugar Topping: In a small bowl, combine the remaining 1/4 cup of granulated sugar with the 1 1/2 teaspoons of ground cinnamon. Mix well.
- Sprinkle & Bake: Sprinkle the cinnamon-sugar mixture generously and evenly over the top crescent roll layer. Bake for 20-23 minutes, or until the top is golden brown and bubbly.
- Cool Completely: Remove from oven and let it cool on a wire rack for at least 45 minutes to 1 hour before slicing and serving. For best results and cleaner slices, cool completely and then chill in the refrigerator for 2-3 hours if desired.
Notes
- Room Temperature Cream Cheese: For the smoothest, lump-free filling, ensure your cream cheese is fully softened to room temperature.
- Pre-Baking is Key: Don’t skip the 4-minute pre-bake of the bottom crust; it helps prevent a soggy bottom!
- Serving: Delicious served warm or chilled. Pairs wonderfully with a dollop of whipped cream or a scoop of vanilla ice cream.
- Storage: Store leftovers covered in the refrigerator for up to 3-4 days.
- Prep Time: 20 minutes
- Cook Time: 27 minutes
- Category: Dessert
- Method: Baking
- Cuisine: Mexican-inspired
Nutrition
- Serving Size: 1 slice (approx. 1/12th of recipe)
- Calories: 481cal
- Fat: 29g
- Carbohydrates: 51g
- Protein: 6g

Gather Your Supplies: Ingredients for Your Mexican Cheesecake Masterpiece
Alright, time to round up your culinary treasures! I love how this recipe uses common pantry staples to create something truly special. You likely have some of these on hand already.
Here’s what you’ll need to create your own slice of Mexican Cheesecake heaven:
- 2 8-ounce packages original crescent rolls
- 2 8-ounce packages cream cheese, softened to room temperature
- 1 stick (which is 1/2 cup) unsalted butter, melted
- 1 1/4 cups granulated sugar, which you’ll divide
- 1 tablespoon pure vanilla extract
- 1 1/2 teaspoons ground cinnamon
A quick tip from my kitchen to yours: opt for full-fat cream cheese for the richest, most decadent filling. It really makes a difference in the final texture. Also, ensuring your cream cheese is properly at room temperature will help you achieve that perfectly smooth, lump-free consistency when you mix it. Nobody wants lumpy cheesecake, right?
Okay, this is where the real excitement begins! Grab your apron, and let’s turn those simple ingredients into an absolutely irresistible Mexican Cheesecake. I promise, you’ve got this!
Here’s the step-by-step guide:
Let’s Bake Some Magic: Step-by-Step to the Perfect Mexican Cheesecake
Follow these easy steps, and you’ll be pulling a pan of golden, bubbly deliciousness out of your oven in no time. I always find the process quite satisfying – it’s amazing how quickly it all comes together!
Prepping the Foundation
First things first, we need to get our base ready. This initial step is key for a great texture.
- Get your oven preheating to the temperature specified on your crescent roll package (usually around 350-375°F or 175-190°C – always check the packaging!). Then, take your 9×13 inch casserole dish and spray the bottom with a good non-stick cooking spray. This ensures your masterpiece won’t stick.
- Carefully unroll one package of the crescent rolls and lay the dough out on the bottom of your sprayed dish. I gently press the seams together to form a solid crust. Don’t worry if it’s not perfectly even; rustic charm is part of its appeal!
- Now, pop that dish into your preheated oven and bake the bottom crust for just about 4 minutes. Then, carefully remove it from the oven. This little pre-bake is my secret weapon against a soggy bottom – it makes a world of difference!
Crafting the Creamy Dream
With our base slightly pre-baked and smelling wonderful, it’s time for that luscious cream cheese layer.
- Take your room temperature cream cheese (remember, nice and soft!) and place it right on top of that warm crescent roll base you just baked. The warmth from the crust will help make the cream cheese even easier to spread.
- Using a spatula (or the back of a spoon in a pinch!), slowly and gently spread the cream cheese in an even layer over the crescent roll base. I sometimes use a small offset spatula for this task; it glides over the cream cheese making it beautifully smooth. Take your time here for a lovely, even layer.
The Sweet Surrender – Butter and Sugar Layer
Prepare yourself for what I like to call the “magic potion” part of this recipe. This buttery, sweet mixture is pure gold.
- In a medium bowl, combine your melted unsalted butter, 1 cup of the granulated sugar, and the tablespoon of vanilla extract. Stir it all together until it’s well combined. The aroma alone is enough to make you happy!
- Now, pour this glorious butter-sugar-vanilla mixture evenly over the top of that lovely cream cheese layer. Try not to just eat this mixture with a spoon. Or do, I’m not your supervisor. It’s that good!
Topping it Off & Baking to Golden Perfection
We’re in the home stretch! Time to add the top layer and that irresistible cinnamon-sugar crunch.
- Carefully unroll the second package of crescent rolls and place this dough on top of the butter-sugar mixture, creating the top crust. Again, gently press any seams together. It’s okay if it looks a little free-form.
- Next, prepare your cinnamon-sugar topping. In a little bowl off to the side, blend together the 1/4 cup of sugar you set aside with the 1 1/2 teaspoons of ground cinnamon until they become one happy mixture. Give it a good mix with a fork or your fingers to make sure that cinnamon is beautifully distributed through the sugar.
- With your cinnamon-sugar ready, go ahead and generously blanket the top crescent roll layer with this fragrant mixture. You want to ensure every future bite gets a touch of this spicy sweetness, so spread it out evenly. Don’t be shy here; this is what gives your Mexican Cheesecake its signature sweet and spiced crunch!
- Now, the moment of truth! Place the casserole dish into your preheated oven and bake for 20-23 minutes. You’re looking for a beautifully golden brown top that’s bubbling invitingly around the edges. Oh, and a quick warning: your kitchen is about to smell absolutely divine! This is the part where family members mysteriously start appearing in the kitchen.
The Hardest Part – Letting it Cool
I know, I know, this is pure torture, but it’s a crucial step for the best results!
- Once it’s perfectly golden and bubbly, carefully remove your Mexican Cheesecake from the oven. Now, for the ultimate test of willpower: you need to let it cool. I recommend letting it sit on a wire rack for at least 30-45 minutes to cool down and set up a bit before you even think about slicing into it. If you prefer it chilled (which is also amazing!), let it cool to room temperature, then cover it and pop it in the fridge for a couple of hours.
Level Up Your Mexican Cheesecake: Tips, Twists, and Serving Ideas
One of the things I absolutely adore about this Mexican Cheesecake recipe is how it provides a wonderful canvas for a little creativity. Plus, a few extra pointers never hurt anyone, right?
My Top Tips for Success
I’ve made this countless times, and here are a few nuggets of wisdom I’ve picked up along the way to ensure your cheesecake turns out perfectly every single time:
- Embrace Room Temperature: I know I mentioned it before, but using truly room temperature cream cheese is a non-negotiable for that ultra-smooth, creamy filling. Seriously, let it sit out for a good hour or two.
- Watch it Like a Hawk (Almost!): Ovens can be quirky little beasts. Towards the end of the baking time, keep a close eye on your cheesecake. You want it beautifully golden and set, but don’t overbake, as it can become a bit dry.
- Chill for Clean Slices: If you’re aiming for those super neat, bakery-style squares, let your cheesecake cool completely and then chill it thoroughly in the refrigerator for at least a couple of hours (or even overnight) before cutting. A chilled cheesecake slices much more cleanly.
Fun Variations to Try
While the classic version is divine, sometimes it’s fun to mix things up! Here are a few variations I’ve experimented with that have yielded delicious results:
- Citrus Zing: Add about a teaspoon of fresh lime or orange zest to your cream cheese mixture. It introduces a lovely, subtle brightness that cuts through the richness beautifully. Ever wondered how a dash of citrus can completely transform your dish?
- Chocolate Lover’s Dream: Once the cheesecake has cooled, why not drizzle it with some melted dark or milk chocolate? A light dusting of cocoa powder also looks elegant and adds a hint of chocolatey goodness.
- Nutty Crunch: Consider sprinkling some toasted chopped pecans or walnuts over the cinnamon-sugar topping before baking for an added textural element and nutty flavor.
- Fruity Companions: While not mixed in, serving a slice with a spoonful of fresh berries (like strawberries, raspberries, or blueberries) or a simple homemade fruit compote (think cherries or peaches) takes it to another level.
When I tried adding orange zest once, it instantly reminded me of a sophisticated pastry I’d enjoyed at a little boutique bakery. It was such a simple addition, but it gave the Mexican Cheesecake an unexpectedly fancy flair without any extra real effort!
Serving Suggestions
This dessert is wonderfully versatile in how you can present and enjoy it.
- Keep it Classic: Serve warm squares with a dollop of whipped cream or a scoop of vanilla bean ice cream. You’ll love how the varying temperatures and textures play off each other – it’s a real treat for the senses!
- Coffee Shop Vibes: A slice of this Mexican Cheesecake pairs perfectly with a hot cup of coffee, a latte, or even a spiced chai. It’s an ideal afternoon pick-me-up.
- Party Perfect: Because it’s made in a casserole dish and slices easily into squares, it’s a fantastic option for potlucks, family gatherings, or any event where you need an easy-to-serve dessert. Plus, preparing it a day in advance is totally doable!
- Warm or Chilled?: Honestly, it’s delicious both ways! Some people in my family prefer it slightly warm, gooey, and fresh from the oven (after a bit of cooling, of course!). Others love it cold from the fridge, where the filling firms up more. Why not try it both ways and decide on your favorite?
Conclusion: Ready to Bake Up Some Joy?
So there you have it – a ridiculously easy yet incredibly delicious Mexican Cheesecake recipe that’s destined to become a staple in your dessert repertoire. We’ve seen how, with just a few simple ingredients like original crescent rolls and cream cheese, and straightforward steps, you can create a dessert that tastes like it came from a specialty bakery. It’s quick, it’s practically foolproof, and the reward is that golden, bubbly, cinnamon-sugar-topped slice of heaven.
I truly hope you feel inspired to give this recipe a whirl. I absolutely love making it, and even more, I love seeing the smiles it brings to people’s faces. When you do try it, please come back and share your experience in the comments below! Did you add any unique twists? Did it disappear in record time? I’d be thrilled to hear all about your Mexican Cheesecake adventures.
Happy baking, my friend! Get ready to fill your home with the most incredible aroma and watch as everyone clamors for just one more piece. You’ve got this!
Loved this recipe? Don’t miss out on more deliciousness! Follow me on Facebook and Pinterest for daily inspiration, behind-the-scenes fun, and all my latest culinary adventures!
Your Mexican Cheesecake Questions Answered (FAQ)
I’ve gathered some of the most common questions people ask about this type of Mexican Cheesecake. Hopefully, these answers clear things up and give you even more confidence to bake this delight!
What is the difference between Mexican cheesecake and regular cheesecake?
Great question! The Mexican Cheesecake we’re making today stands apart from a “regular” or New York-style cheesecake in a few delightful ways.
Crust: This recipe features a unique, quick crust made from original crescent rolls on both the bottom and top, giving it a flaky, buttery, almost pastry-like quality. Traditional cheesecakes usually have a crumbly graham cracker, digestive biscuit, or shortbread crust, typically only on the bottom.
Texture & Structure: While our filling is rich and creamy thanks to the cream cheese, the overall dessert is often a bit lighter and less dense than many classic baked cheesecakes. It’s more like a decadent bar or a “sopapilla cheesecake.”
Baking Method: This version is baked openly in a casserole dish, simplifying the process. Many traditional cheesecakes require a springform pan and often a water bath (bain-marie) to ensure even baking and prevent cracking, which can be a bit fussy.
Topping: The generous cinnamon-sugar topping is a hallmark of this particular style of Mexican Cheesecake, lending it a warm, churro-like essence that you don’t typically find on a plain or fruit-topped regular cheesecake.
What is the Mexican version of cream cheese?
Our recipe uses standard, readily available cream cheese, the kind you find in any supermarket. This works perfectly to create that luscious, tangy filling we all love.
For those interested in exploring authentic Mexican dairy products, there is queso crema which is essentially Mexican cream cheese. It can vary in texture and richness by region and producer, sometimes being a bit saltier or richer than its American counterpart. While you could potentially experiment with queso crema if you can find a good quality one, this specific Mexican Cheesecake recipe is designed and tested with standard cream cheese, ensuring delicious and consistent results.
What is Mexican cheesecake called?
The term “Mexican Cheesecake” for this recipe is often a descriptive name that refers to cheesecake variations, like ours, that incorporate flavors and textures reminiscent of some popular Mexican sweets – particularly the cinnamon-sugar combination found on treats like churros or sopapillas. You might also hear this specific style called “Sopapilla Cheesecake” or “Cheesecake Sopapilla Bars” due to the crescent roll dough and cinnamon-sugar topping creating a sopapilla-like effect.
While Mexico has its own array of traditional desserts and cheesecakes (pay de queso), this particular recipe with crescent rolls is more of a popular, simplified, and incredibly tasty adaptation that has become a beloved treat in many places, especially where a quick and delicious dessert is appreciated.
What is a traditional Mexican dessert?
Mexico has a rich and incredibly diverse dessert tradition, with so many amazing treats to explore! While our Mexican Cheesecake is a delightful and easy recipe, it’s more of a popular modern creation. Some truly iconic traditional Mexican desserts include:
Flan: A creamy caramel custard, beloved throughout Latin America.
Tres Leches Cake (Pastel de Tres Leches): A sponge cake soaked in three kinds of milk – evaporated milk, condensed milk, and heavy cream. It’s unbelievably moist and decadent.
Churros: Fried dough pastries, often dusted with cinnamon sugar and served with chocolate or caramel dipping sauce.
Arroz con Leche: A sweet and creamy rice pudding, typically flavored with cinnamon and vanilla.
Capirotada: A type of Mexican bread pudding, often made with nuts, fruits, cheese, and a sweet syrup, particularly popular during Lent.


