
Have you ever been mesmerized by those delicate, shredded nests of pastry in Mediterranean desserts and thought it was pure magic? I remember the first time I saw a tray of glistening, honey-soaked kataifi nests in a little Greek bakery downtown. The texture looked so intricate and complex, like golden spun silk, that I was convinced it was the work of a pastry wizard with years of secret training. I bought three, ate them on the spot, and filed “making kataifi” away in my brain under “deliciously impossible things.”
But what if I told you that ‘pastry wizard’ could be you? What if the ‘secret training’ involved little more than a whisk and a non-stick pan? For years, I avoided trying it myself, completely intimidated by how professional it looked. When I finally took the leap, I was shocked to learn that the “magic” is just a simple, thin batter and a really fun technique.
Today, I’m pulling back the curtain and sharing my foolproof guide to making fresh, homemade kataifi dough. We’re going to walk through this together, step by step, and I promise that by the end, you’ll feel confident enough to whip up this incredible pastry whenever the craving strikes. Get ready to impress yourself (and everyone else you know!).
Table of Contents
What is Kataifi Dough, Really? A Quick Guide
So, let’s talk about what these mysterious strands of dough actually are. At its most basic, kataifi dough is a type of delicate, unleavened pastry, often called “shredded phyllo.” It forms the foundation of countless sweet and savory dishes across the Middle East and Mediterranean, famous for baking into a delightfully crispy and golden nest-like texture.
You might think something so unique requires a long list of complicated ingredients. The beauty of this recipe, however, lies in its simplicity. Our homemade kataifi dough uses just a handful of pantry staples: all-purpose flour, cornstarch, water, sugar, salt, and a little vegetable oil. The cornstarch is the secret weapon here; it is essential for creating that signature light and crispy finish.
Now for the big question: is it the same as phyllo dough? That’s a fantastic point of confusion, but they are not identical. Think of them as close cousins. Both are made from a similar flour-and-water batter, but phyllo is stretched into paper-thin sheets. We create kataifi by drizzling that same batter into thousands of fine, thread-like strands. In short: phyllo is sheets, and kataifi is threads.
Why You Should Try Making Your Own Kataifi Dough
I know it might seem easier to just grab a box from the store freezer, but trust me when I say that making your own kataifi dough is a total game-changer. If you’re still on the fence, here are a few reasons why you’ll fall in love with the homemade process:
- Incredible Freshness and Texture. There is simply no comparison to the texture of freshly made kataifi. Store-bought versions can sometimes be dry or brittle from freezing, but your homemade dough will be soft, pliable, and bake into an unbelievably light and crispy masterpiece. The difference is truly stunning.
- You Are the Master of Your Ingredients. You have complete control over what goes into your dough. This recipe uses just six basic ingredients that you can pronounce, with no strange preservatives or dough conditioners. It’s pure, simple, and tastes all the better for it.
- It’s Genuinely Fun (and So Impressive!). Let’s be honest, there is something incredibly satisfying about turning a simple batter into delicate, professional-looking pastry strands. You get to feel like a culinary artist creating a beautiful, edible web. It’s a fun, almost meditative process that yields spectacular results.
- Unlock a Whole New World of Recipes. Once you know how to make the dough, you can explore so many amazing dishes. You can create the classic honey-and-walnut nests, tackle the legendary cheese-filled dessert Knafeh, or even experiment with savory appetizers filled with feta and herbs. The possibilities are endless!
Equipment and Ingredients You’ll Need
One of the best parts about this recipe is that it doesn’t require any super-specialized, expensive machinery. You probably have most of what you need tucked away in your kitchen already!
Essential Equipment
- A piping bag with a small round tip. This is the star of the show and the key to getting those super-fine strands. A squeeze bottle with a narrow tip also works in a pinch!
- A large, non-stick pan or skillet.
- A whisk for creating a smooth batter.
- A medium mixing bowl.
- A fine-mesh sieve (optional, but highly recommended for the smoothest possible batter).
- A spatula for gently lifting the delicate pastry from the pan.
Simple Ingredients for the Batter
Here is the short and simple list of ingredients that will transform into incredible homemade kataifi.
- ¾ cup all-purpose flour
- ⅔ cup cornstarch
- 1 teaspoon sugar
- ½ teaspoon salt
- 1 tablespoon vegetable oil
- 1 cup water
How to Make Kataifi Dough: A Step-by-Step Tutorial

Alright, let’s roll up our sleeves and make some magic. I’ve broken down the process into five simple steps. Follow these closely, and you’ll be a kataifi pro in no time!
Step 1: Create the Perfect Batter
In a medium mixing bowl, whisk together your dry ingredients: the all-purpose flour, cornstarch, sugar, and salt. I like to give them a good whisk for at least 30 seconds to make sure everything is perfectly combined before adding any liquids. This little step is your first defense against lumpy batter!
Step 2: Add the Liquids for a Silky-Smooth Mix
Pour the vegetable oil and water into your dry ingredients. Now, whisk vigorously until the batter is completely smooth and you can’t see any lumps. For an ultra-smooth, professional-grade consistency, I highly recommend straining the batter through a fine-mesh sieve directly into your piping bag. It’s a small step that guarantees you won’t get any clogs later.
Step 3: Prepare for Piping
Transfer your smooth batter into the piping bag fitted with a small round tip. This part is crucial: cut the opening of the tip very small. You are aiming to create strands about the thickness of angel hair pasta. It is always better to start too small and snip a tiny bit more off if needed. While you do this, begin heating your non-stick pan over a steady low heat.
Step 4: Cook the Strands (This is the Fun Part!)
Working quickly but gently, squeeze the piping bag and create a continuous zig-zag or swirling pattern across the entire surface of the warm pan. Your goal is to create a beautiful, chaotic web of pastry. Don’t worry about making it perfect—this isn’t calligraphy class, thank goodness. The batter will cook almost instantly. You are not looking for any browning; the strands should be cooked but remain pale.
Step 5: Harvest and Cool Your Homemade Kataifi
The pastry is ready in just a few seconds, as soon as it looks dry and begins to naturally peel away from the pan. Carefully lift the entire sheet from the pan with a spatula and transfer it to a large plate or a sheet of parchment paper to cool. Repeat this process until all your batter is gone, and just like that, you have a beautiful pile of homemade kataifi dough ready to use!
7 Pro Tips for Flawless Homemade Kataifi Dough
You’ve got the basic steps down, but are you ready for a few secrets that will guarantee your kataifi dough is absolutely perfect every single time? These are the little details that take your pastry from good to truly spectacular.
- Check Your Batter Consistency. Your batter should have the consistency of a thin crepe batter or heavy cream. If it’s too thick, it won’t pipe easily into fine strands. If it’s too thin, it will spread too quickly in the pan. You can always adjust by adding water or flour, one teaspoon at a time, to get it just right.
- Try the Squeeze Bottle Hack. If a piping bag feels clumsy, try using a clean plastic squeeze bottle (like one for condiments) with a narrow tip. Many people find the steady, even pressure from a bottle makes it easier to create consistent strands.
- Don’t Let the Strands Pile Up. While your goal is a dense, overlapping web, you should avoid creating a single, thick pile of batter in one spot. Keep your hand moving steadily across the pan to create a single, relatively even layer. This ensures every strand cooks through quickly.
- Cover the Finished Dough. As you make your sheets of kataifi, cover the growing pile with a clean, slightly damp kitchen towel. This is a classic pastry chef trick that prevents the delicate strands from drying out and becoming brittle while you finish cooking the rest of the batter.
- Do a “Practice Drizzle.” Before your pan is fully heated, do a quick practice drizzle over a cool plate or a piece of parchment paper. This helps you get a feel for the pressure you need to apply and the speed of the motion without wasting any of your precious batter.
- Keep the Heat on Low. I know I’ve said it before, but this is the most important tip of all! High heat will make the dough brown and crispy in the pan. You want the strands to be cooked but remain pale and pliable, ready to be shaped and baked in your final recipe.
- Store It Properly for Later. If you aren’t using the dough right away, let it cool completely first. Then, wrap it well in plastic wrap and place it in an airtight container. It will keep perfectly in the refrigerator for a few days or in the freezer for up to a month.
Frequently Asked Questions (FAQ)
You’ve got questions, and I’ve got answers! Here are a few common queries that pop up when making homemade kataifi.
What is a substitute for kadayif?
This is a great question! First, it’s helpful to know that “kadayif,” “kadaif,” and “kataifi” are all different spellings for the same delicious thing. If you absolutely cannot make it or find it, your best bet for a textural substitute would be to use very thin, broken angel hair pasta (vermicelli) or finely shredded wheat cereal. Keep in mind, however, that the flavor and baking properties will be quite different.
Does Walmart sell shredded phyllo dough?
The availability of pre-made kataifi dough at large chains like Walmart can be very hit-or-miss depending on your location. Your most reliable options are to check the freezer section of a well-stocked supermarket, a Mediterranean or Middle Eastern specialty grocery store, or online food retailers that specialize in international ingredients.
How do I use my homemade kataifi dough?
Now for the fun part! You can use your fresh dough to make incredible desserts like classic Kataifi Nests with nuts and honey, the famous cheese-filled Knafeh, or even savory appetizers by wrapping it around feta cheese or shrimp before baking.
Can I make this dough gluten-free?
This specific recipe relies on the gluten in all-purpose flour for its structure. While I have not personally tested it, you could experiment with a high-quality, 1-to-1 gluten-free all-purpose flour blend. Please be aware that the texture may come out differently, and the strands might be more delicate to handle.
Your Kataifi Adventure Awaits!
And there you have it—the entire process of making beautiful, fresh kataifi dough from scratch, completely demystified! It all boils down to a simple batter, a warm pan, and a few minutes of fun, creative drizzling. You’ve learned the secrets, from getting the batter just right to keeping the finished strands perfectly pliable.
Now that you’re a kataifi-making pro, the real adventure begins. I absolutely love seeing your creations, so please try this recipe! Drop a comment below to let me know how it went or what you plan to make first. I can’t wait to hear all about it!
You’ve officially unlocked a new level of pastry-making, and you should be incredibly proud. Thank you for joining me in the kitchen today. Happy cooking, and enjoy every last bite of the magic you’ve made!
If you love my kataifi dough recipe, you need to try my Dubai Chocolate Strawberries
For more delicious recipes and behind-the-scenes fun, follow along with me on Facebook and Pinterest!
Print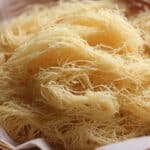
You Won’t Believe How Easy It Is to Make Kataifi Dough From Scratch!
- Total Time: 0 hours
- Yield: 1 pound 1x
Description
Learn how to easily make delicate, golden kataifi pastry strands at home from simple ingredients—a fresh alternative to store-bought versions that adds crisp texture to both sweet and savory dishes.
Ingredients
For the Kataifi Batter:
- ¾ cup all-purpose flour
- ⅔ cup cornstarch
- 1 teaspoon sugar
- ½ teaspoon salt
- 1 tablespoon vegetable oil
- 1 cup water
Equipment Needed:
- Piping bag with small round tip
- Non-stick pan
- Whisk
- Fine mesh sieve (optional)
Instructions
Create the Perfect Batter: In a medium mixing bowl, whisk together the all-purpose flour, cornstarch, sugar, and salt until completely combined. The cornstarch is key – it creates that delicate, crispy texture that makes kataifi so special.
② Add the Liquids: Pour in the vegetable oil and water, then whisk vigorously until the batter becomes completely smooth and free of any lumps. For an ultra-smooth consistency, strain the batter through a fine mesh sieve directly into your piping bag.
③ Prepare for Piping: Transfer the smooth batter into a piping bag fitted with a small round tip. Cut the tip opening very small – this is crucial for creating those authentic thin kataifi strands. Heat a non-stick pan over low heat until evenly warmed.
④ Create the Magic: Working quickly but gently, squeeze the piping bag and create a continuous zig-zag pattern across the heated pan, moving from one side to the other in overlapping waves. The batter will instantly cook upon contact, forming those beautiful golden strands.
⑤ Harvest Your Kataifi: As soon as the pastry begins to naturally peel away from the pan (just a few seconds), carefully remove the entire sheet using a spatula. Transfer to a plate to cool and repeat the process until all batter is used. You’ll have gorgeous, homemade kataifi ready for any recipe!
Notes
The secret to perfect kataifi lies in maintaining low, consistent heat and working with smooth, lump-free batter! If your pan is too hot, the strands will cook too quickly and may become brittle. Practice your zig-zag motion before you start – smooth, continuous movements create the most beautiful, even strands. This homemade kataifi can be made ahead and stored in an airtight container for several days, or frozen for future use in kunafa, baklava, Dubai chocolate bars, or any Middle Eastern dessert your heart desires!
- Prep Time: 15 mi
- Cook Time: 30 minutes
- Category: Dessert
Nutrition
- Serving Size: 1 portion
- Calories: 785 kcal
- Sugar: 4g
- Fat: 15g
- Saturated Fat: 2g
- Carbohydrates: 150g
- Fiber: 9g
- Protein: 10g


